Friday 2 August 2013

Drupal- The Warrior of Web Development

INSTALLATION PROCESS


Q) How to install drupal in the system?

Requirements:
Installation:

  • Download the drupal 7.22 version from above link
  • Go to Mozilla Firefox and type: localhost


  • The downloaded file is of tar format, so unzip the file.
  • Copy the extracted file to /var/www
This could be achieved using terminal(ctrl+alt+T)
$ sudo cp drupal-7.22 /var/www
$ password

  • Now, go to Mozilla Firefox and type localhost/drupal-7.22
 

  •  Follow the image sequences


  • Normally we get 2 errors at this stage then just open terminal and type:
$ cd /var/www/drupal-7.22/sites/default
 
follow the image...


  • Again open the existing Mozilla window and press F5, for refresh
  • Out of 2 only one error will be remaining.

 To remove this open terminal

Follow the image sequence


open terminal and create a database using the commands shown in image:


 Installation of Profile


Congratulations U are installed Drupal successfully to your system..
 
Enjoy!!!

Drupal - The Warrior of Web Development

DRUPAL


is a free, open-source web development platform for online content and user communities. Drupal powers some of the busiest sites on the web, and can be adapted to virtually any visual design. Drupal runs over a million sites, including White House.gov, World Economic Forum, Stanford University, and Examiner.com.

Q) Why Drupal?


Drupal is open
  • is open

Drupal was created over ten years ago and released as open-source software under the GNU Public License. That means it’s completely free to download, use, and modify: There are no purchase, license, or maintenance fees.


Drupal is web development
  • is web development

Drupal’s default installation is a database-backed web platform with file maintenance tools and a high level of security. Many developers take advantage of Drupal’s extensible architecture to go far beyond the “core” package.


Drupal is social
  • is social

Drupal is a multi-user system, letting site visitors log in (as “authenticated” users) or browse the site without doing so (as “anonymous” users). You control their access levels, and can also assign “roles” for multiple permission levels.


Drupal is content
  • is content

Drupal both hosts and promotes your content. It can reach out beyond your site to give you a presence on Twitter, Facebook, and in other venues. Drupal’s built-in features also give search engines what they want, improving your web impact automatically.


Drupal is scalable
  • is scalable

Drupal has proven itself repeatedly in the field on sites with over a million pages, and at over 20,000 requests per second. Its core installation handles over 99 percent of use cases, while free optimization tools and a large base of Drupal-trained administrators address the other one percent.


Drupal is design
  • is design

Drupal site designs come from “themes”, whose visual presentation is described in standard CSS. Drupal.org hosts hundreds of free, fully customizable themes, including several “base themes” to help you launch your own designs.


Drupal is everywhere
  • is everywhere

Drupal runs millions of web sites, including many of the world’s biggest. It’s especially strong among major governments and industry-leading enterprises, but is easy enough to be the platform of choice for individuals and small companies.


Drupal is Secure
  • is secure

Drupal is used by thousands of high profile web sites and is subject to rigorous security testing both by the Drupal community and by security experts around the world. Drupal's core code has been proven to prevent common security vulnerabilities such as those defined by the Open Web Application Security Project (OWASP).

Tuesday 30 July 2013

Miracle of Inkscape


Power of Inkscape - One of the Best Free Software tool for Photo Editing


  1. One of the best free software tool for photo editing and creation is Inkscape.
  2. This is easier than working with the tools of Adobe photoshop and cost of inkscape is $0.
  3. You can download and install the software using Ubuntu software centre.

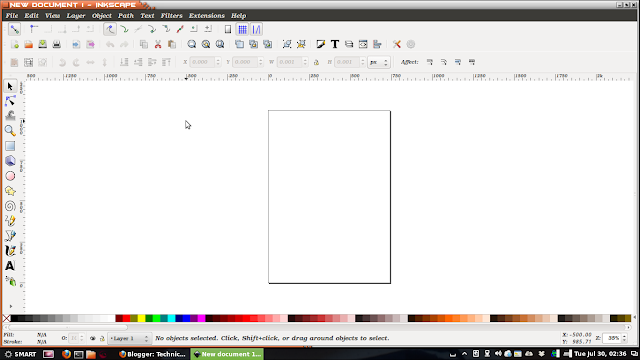
  • The interface of inkscape is as shown:


  • The properties of the page can be changed using "file->Document properties or (shift+ctrl+D)."
  • This option is used for page format and its properties, the user can set according to their requirement.


  • Using this properties the height and width can be suitably set and adjusted. 
  •  Different tools used in this software is shown below:
  •  All the tools are cool and easy to implement.


Q) How to create an effective posters and banners?

         To answer the above question let us consider an example, image shown below is made using inkscape:


To do an effective poster the major requirements are 
  • Attractive Fonts
  • Awesome Backgrounds
  • High Quality Images and Logos
  • Systematic and structural Placing of above elements
Special effects in poster can be created using following tools: go to "objects-> fill and Stroke"

 There are many different options that can be achieved using this option, they are:
  • opacity% : To increase and decrease the backgrounds,
  • blur: Name itself suggest the functionality,
  • fill: To change the colour and add effects to the image


Let us design the above poster

step1: Put the background to the Rectangle field.
step2: Adjust the Opacity and Blur % of the background.
step3: Put the logos and select the required fonts to be used in the poster.

  •  The main thing to be noticed is each and every images, text, logo, and background is taken as frames. In the above case there are 5 frames.
  • The freedom of this software is the user can select any frame using Left click without any difficulty unlike any other software.
step4: Adding text and adjusting the frame by left click of mouse. If the mouse is difficult to use then we can use arrows of keyboard for perfect placement of frames in the field


step5: Adding Stroke to the text is shown below using "object->Fill and Stroke" and user is free to select any type of colour present and inkscape provides 5 different flat colours that is RGB, HSL, CMYK, Wheel & CMS.


step6: Adding the images (basically the images are from internet) to the poster and adding relative title.
-> The Kannada font and text is achieved using google Kannada convertor online is copy and paste.
step7: The basic stuff is ready but the actual task starts to give additional effects.

  •  copy the "DRUPAL" text and paste it there itself but just change the opacity % and position of text behind the original text.


-> Similarly, copy the "ANDROID" text, using mouse revert the text and add the stroke effect called "Radial gradient" to the text.


step8: Finally add the other additional text to required field to the poster. And finally we get the image shown below.
The main work is that user should be able to place the frames in proper manner for getting the complete job satisfication.

Sample examples of inkscape posters


Not only this go to link:  
All the posters and banners which is available there are all made using inkscape.

That it!!!
Any query in using inkscape just add a comment and i will be happy to help.

Monday 29 July 2013

Introduction to Blender 3D simple Animation


Q) How to Create and Customize the 20th Fox century logo to your own required Animation.

      Let me show you a simple animation of customization using Blender 3D


The above video is customized version of 20th fox century

REQUIREMENTS TO DO ABOVE ANIMATION

1. A computer with good condition having more than 2GB RAM, Processor speed more than 2.5GHz and continues power supply(UPS).

2. You can download the basic and fundamental templates files from the link shown below. 


3. Blender 3D software from internet or Ubuntu Software centre.

Instructions

1. First open the template file named " 20th Century Fox Template.blend" in Blender software


• Right click on the text to select it.
• Press the DEL-key and left click to confirm.
• Press the TAB-key to start editing.
• Edit the text


• Press the TAB-key to stop editing.
• Left click and drag the red and green squares to re-size.
• Change to moving mode by left clicking the arrow.
• Select multiple objects by holding SHIFT and right clicking.
• Left click and drag the red and green arrows to move the object.
• Click File, Save As, and save your project file.
• Choose your desired resolution (leave it at Render Presets: HDTV 1080p for best quality)
• Choose your desired output format (leave it at H.264 for best compatibility)
• Click Animation
• Wait for a few hours.
• The file is by default saved to the folder where you unzipped the template files and is called 0001-0600.avi (600 frames).


* Friends the Rendering of the above animation will take more than 12 hrs so have patience since this has 600 frames.


2. Please note if you are using letter "T" in the above template then there will be flickering as shown below:


  • To avoid the above case:
- Right click to select your title.
- Press Alt + C
- Left click on "Mesh from Curve/Meta/Surf/Text"
- Do this for every line of your title
- Render
and you will see the flickering has gone and the image will be


3. To move the Title up and down use the options shown below


Hope all the possibilities and techniques are covered.

Happy animation......

Any Query you are free to comment me...